Showing posts with label Embroidery. Show all posts

Monday, December 19, 2016

Five Hand Embroidery Winter Patterns

Crafted Spaces is excited to introduce its' first winter hand embroidery collection. This embroidery collection features five beautiful holiday and winter motifs that can be used on many different projects. We are featuring these designs as 4" embroidery hoop ornaments, but you can scale the patterns to suite other projects. These charming little ornaments can be hung on your Christmas tree or given as sweet stocking stuffers for the holidays.


The designs range slightly in the amount of time it requires to create them, but they all have just a few simple embroidery stitches. Our online store offers a PDF download that you can purchase and receive directly in your email. We also have available, limited quantities of our full embroidery kits.

The embroidery kits include:
  • printed copy of the pattern
  • pre-printed 100% cotton pattern
  • instructions
  • ribbon
  • embroidery floss
  • embroidery needle
  • stitch guide
  • tracing paper
Transferring Your Pattern
There are several methods for transferring your embroidery pattern onto your fabric or other materials. The type of material you use will determine the best transfer method. The ornaments seen in this post, were made with eco felt. Felt is a bit heavy and the method I chose was to create an iron on transfer. To create the transfer I used tracing paper (transparent paper or onion skin) and an iron on transfer pen. I placed the paper over the "reverse" image of the pattern and traced over the design using the pen. I then placed the design down on my felt and used a dry, hot iron on the back of the paper. Any wax free tracing paper should be good for this process. I was able to find tracing paper at Wal-Mart and the dollar store.

Tip! Lift occasionally on one end to see if the design transfers successfully. Do not remove or shift the paper until the design has been transferred. With any method you use, it is recommended that you first test with a swatch of your fabric.

Embroidery Floss
Six-strand cotton embroidery floss was used in the projects shown. I chose white floss on a red background for a traditional holiday feel. I also think it will also look lovely on a natural linen fabric. I used DMC brand cotton embroidery floss in Blanc. Divide your embroidery floss by pulling apart three stands together. For the projects shown, three strands were used for all of the stitches except the French Knots. The French Knots were made using six strands (three strands doubled over). You can vary the thickness of your stitches by changing the number of strands you choose to work your stitches. I suggest playing around with the number of strands you use and see what you like best.

Finishing Your Embroidery Work
To finish the back of the embroidery ornaments, I tied off and trimmed the threads. I then trimmed away the excess fabric, close to the edge of the hoop. Using a small amount of fabric glue; I then attached a piece of felt cut to the size of the inner hoop. You could also use another type of glue, just ensure that it will not show through the layers of your fabric. The method I choice for finishing these embroidery ornaments can also work for other projects. I then tied a length of ribbon to hang.


Crafted Spaces Holiday Embroidery Collection is available here!
Check out our Pinterest board for great links to other embroidery resources.

Thursday, February 20, 2014

Thrift Store Find: Needlepoint Art

This past week I found this stunning needlepoint at the thrift store. I love this piece because the roses just seem to pop, and I feel like smelling them. I was also drawn to this piece because of the stunning blue vase. I love this colour blue and I am thinking of using the same colour in an upcoming upholstery project.


I do not think that it is a secret that I absolutely love, love, love embroidery and other needlework pieces. I collect vintage pieces, but I am also happy to see new works popping up each day and becoming popular again. If you will like to try your hand at some needlework, you can try making a piece with patterns from designers such as Anna Maria Horner and Heather Bailey. There are also lots of patterns to choose from on sites such as Etsy. You can also try my free embroidery pattern.

I want to take this opportunity to answer a question that I have recently received, about how I choose my embroidery or needlework pieces.

When I come across a piece at the thrift store or antique market, there are a few things that I consider before purchasing:
  • Do I love it? - If I see a piece and instantly fall in-love, then chances are it is coming home. I must love the design.
  • Consistency of the stitches - Sometimes you come across a piece that was perhaps done by someone who was new to needlework and you can see some of the errors they made. The most common error I have observed is where the stitching is not uniform or consistent.
  • Wear and tear - Broken stitches and faded areas are two significant reasons I may not buy a piece. Yellowing of the fabric or stains are also things I look out for.
  • Condition of the frame - If it is a framed piece, then I look at the condition of the frame to decide if this is a piece that I will have to re-frame. If it is a frame with an unusual shape or size, then I consider how difficult it would be to re-frame the piece or to use the work in a different way.
  • Usability - Do I have a place for it or can I learn from the pattern? Buying a piece just for the sake of collecting is not generally something I do (although, my husband may disagree). So it is important to me to have a home for it. Having said this, I sometime purchase vintage pieces for the pattern with the hope of learning how to re-create a particular design.
There are so many way you can incorporate these little gems into your decor, and nothing says handmade like a beautiful piece of needlework! I hope this post is helpful the next time you go shopping for embroidery or needlepoint art.

Do you have any tips that you will like to share?

Saturday, November 23, 2013

Vintage Pillowcase Apron

I found this great vintage cotton pillowcase at just .99 cents, and I just had to add it to my vintage fabric collection. There is a hole in the fabric and I had to find a way to mend it so I decided to do an appliqué. I have shared with you the hand embroidered appliqué and the embroidery stitches that I did, so here is the finished apron.


The waistband was made from the same white vintage cotton that I used for the appliqués. I added a bit of interest with a running stitch just along the front.


I like repurposing pillowcases and I really enjoyed this project. An apron is a great gift idea and I think I will be making a few of these this holiday season. There are so many creative ways you can go with an apron project.

Do you have any ideas on how to repurpose a pillowcase?

Saturday, October 5, 2013

Making a Hand Embroidery Appliqué - Part 2


I hope that everyone is having a wonderful weekend. This weekend I have been catching up on a few projects, including my hand embroidered appliqués, that I mentioned several weeks ago. My plan is to make an apron; but as I mentioned before, I needed to do something to repair a hole in the fabric and I think that an appliqué was the perfect solution. Placing one flower seemed a bit skimpy, so I decide to add three flowers. My original plan was to do three different sizes, but I think in the end there is not a huge difference in the size.


I used a combination of chain stitch, running stitch and French knots. I really like the way it turned out and I think that the combination of stitches works really well for the pattern. I also changed the colours slightly, to give each flower a different look. I used two stands of embroidery floss, doubled the thread and knotted the ends together.


My appliqués have been sewn onto my fabric and I am excited to finish my apron. I will be sure to share with you the finished apron.

What do you think of the finished appliqués?


Saturday, September 14, 2013

Making a Hand Embroidery Appliqué


I love making aprons, and this week I decided that I would make an apron from a vintage pillowcase I recently purchased from a thrift store. It is a beautiful cotton print, but there is a hole in the middle of the fabric. I was thinking of ideas on how to cover the area and decided to add an appliqué.


Using a white vintage cotton fabric (from a twin sheet), I cut a piece of fabric large enough to cover one of the flowers on the pillowcase. I placed the white fabric over one of the flowers and secured with pins. I then traced the outline of the flower onto the white fabric using a pencil. There are several other transfer methods I could have used; however, I found this to be a quick and easy method.

I plan on doing a basic running stitch over the lines in alternating colours and will fill the centre of the flower with French knots. I will attach the appliqué with a running stitch on the last row to secure it to the printed fabric. The final phase will be to cut away the excess fabric around the edge of the flower. My plan is to make a total of three flowers of varying sizes.


Do you like appliqués? What do you think of the idea of using an appliqué to cover a damaged area?


Thursday, May 9, 2013

Thrift Store Find: Vintage Needlepoint


This week I will like to share a beautiful piece of needlepoint that I found. This piece is in keeping with our Crafty Home series. It is one of those pieces that can be used as is or it can receive an updated look by changing the picture frame. I plan on giving it new life by making it into a decorative pillow.

If you are interested in tying your hand at some needlework, you can find some beautiful kits at Anna Maria Horner. I also did a book review last year of "Doodle Stitching The Motif Collection," which is a great little resource if you will like an introduction to embroidery. You can also download our FREE embroidery pattern.

Do you think a piece like this is better left as is or is making a decorative pillow a good idea?


Monday, November 26, 2012

Monogram Letters for Embroidery

I have been doing more hand embroidery work lately and I have been designing new pieces. I hope to share more of my creations with you; however, let me know what you think if you have a chance to check out my FREE embroidery pattern.

To add to my renewed exploration into hand embroidery designs I have been doing a lot of research. I am particularly interested in older patterns and combining unique stitches. I came across this blog post on Enbrouderie, that had such a wonderful link that I just had to share. I posted it on my embroidery pinterest board, but felt that it deserved its' own post.

What do your think of this stunning lettering? I really will like to add this to a linen pillowcase or something equally as exquisite. The beautiful illustration can even be used as art on its' own.


Image Source: Antique Pattern Library


If you will like to get the full collection along with other wonderful designs visit the Antique Pattern Library. You can download this collection of stunning lettering here.

Happy stitching!


Saturday, November 10, 2012

Embroidery Hoop Art

Over the years I have enjoyed hand embroidering and have added embroidered details to many of my sewing projects. However, I must admit that it has been some time since I have done any embroidery work. However, due to several request, I have been thinking of adding an embroidery workshop to the Crafted Spaces sewing program.

Earlier this week I did a book review on "Doodle Stitching: The Motif Collection" and as I mentioned in the review, I was inspired to start a new embroidery project. The book has tons of wonderful ideas, but I really wanted to create a design of my own. I also wanted to create something interesting for my studio and thought of making a hoop art piece.

I did not start off with a pattern or even a design in mind. I started by using some sewing chalk to outline the word "create." I then outlined the shape of a tree. The rest of the design just evolved as I was working on the piece. I have incorporated several embroidery stitches, but had the most fun with the "French Knot."

Once the piece was completed, I decided to display it on my new pegboard.


I used a piece of 100% cotton gingham fabric from my vintage fabric stash. I also used eleven different colours of 100% cotton embroidery DMC floss. Most of the stitches were done using three strands of floss; while for areas such as the tree outline I used the full six stands.


You can also make these super cute hoop art pieces with an interesting fabric print and forgo on the whole task of embroidering if you like. I have also seen some great hoop pieces using crochet doilies. I made this smaller piece using a piece of vintage 100% cotton fabric.


I think I will like to make more of these to decorate my studio wall. I definitely need a larger one and a couple in the 6" and 8" hoop size. I have already started a second piece, this time I'm using an oval shaped vintage hoop that I found at the thrift store.

What do you think about hoop art pieces?


UPDATE:
I have created a downloadable pdf of the embroidery design, which I will like to share with you. You can use any combination of stitches or colours you like. If you have any questions, just leave me a comment below.

I used three different shades of green for the leaves, which I did using a daisy stitch. For the flowers I did french knots using three different shades of pink. The bee was done using a combination of back stitch, french knots and the bullion embroidery stitch for the body of the bee. The outline of the tree was done using a stem stitch and the letters were done with a chain stitch.

Here is a FREE download of the pattern. Please let me know how your project turns out. I hope you enjoy!

Click Here for FREE Download!


Tuesday, November 6, 2012

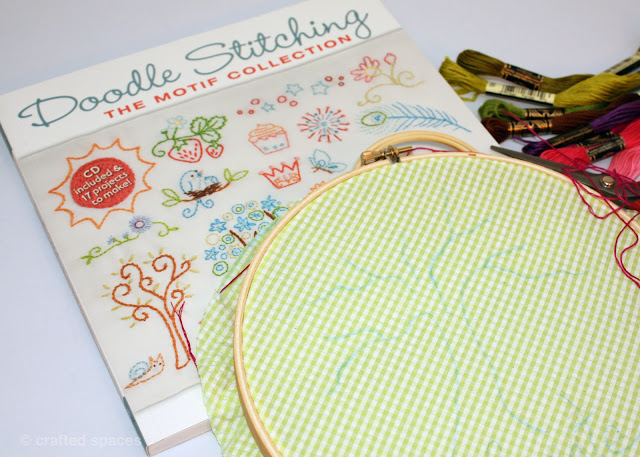
Book Review: Doodle Stitching The Motif Collection


Doodle Stitching: The Motif Collection by Aimee Ray

Today I will like to share a new addition to Crafted Spaces library collection. The book contains "400+ easy embroidery designs" and includes a bonus CD. You can work along with the projects, or use the images to create your own unique combinations. The projects presented are simple and many of them will make great gift ideas.


The images and illustrations are playful, and the instructions are easy to follow. It is a great book for beginners; however, even an experienced stitcher can be inspired by the simplicity and whimsy of the designs. It is great inspiration if you are thinking about transforming your "doodles" into embroidery art, and has lots of ideas for you to play with as well. I also think that the CD is a wonderful treat and it adds additional value to the book.


After reading the book, I was inspired to create a new embroidery pattern. Even though I did not use the images from the book, I have to credit the author with conveying the idea of just having fun with images. I have started my new project and I hope to share it with you in a follow-up post.


To find out more about the author Aimee Ray, visit her blog or website. You can also receive a FREE download via the publisher Lark Crafts. ISBN 13: 978-1-60059-581-3

*As with all of our book reviews, this review was not solicited or endorsed in any way. The opinions expressed are my own and is presented in the spirit of sharing inspirational works and promoting creativity.

Related Posts Plugin for WordPress, Blogger...