Showing posts with label Projects. Show all posts

Monday, July 6, 2015

Scrabble Tile Magnets


I recently made some art using scrabble tile pieces and had some tiles left over. I decided to use the tiles to make some fun magnets as a house warming gift. I had purchased an old scrabble set from the thrift store and the rest of the supplies were items I already had in my craft stash. The magnets are super cute and will also look great using small prints of pictures or images to reflect someones hobby. This is a fun and simple project that you can enjoy with kids and the possibilities are endless.

Supplies
Scrabble Tiles
Decorative Paper ( eg. scrapbook paper)
Magnets (round 15 mm / 0.6 in)
Hot Glue or Super Glue
Glue Gun
ModPodge
Dimensional Magic
Scissors
Small Brush

Instructions
1. Cut the decorative paper to fit the face of the tile, and glue the paper onto tile using ModPodge. Let the tile dry before moving onto the next step.

2. Apply the Dimensional Magic to the top of the decorative paper starting in the center of the tile and working outward. Work slowly releasing a small amount of the solution at a time; a little will go a long way. Remove any bubbles with a pin or needle tip.

3. Let dry for several hours on a flat surface. For best results, I recommend drying overnight and covering with a glass to prevent dust particles from settling on the surface while it dries.

4. Apply a small drop of hot glue or super glue to the back of the tile and press the magnet to attach. Let set or follow instructions on the glue you have used.

Now enjoy!

Here are some other projects you may also want to try:

DIY Coasters
Flowers and Butterfly Magnets
Decorative Magnets
Bottle Cap Magnets
DIY Trinket Box

Saturday, October 5, 2013

Making a Hand Embroidery Appliqué - Part 2


I hope that everyone is having a wonderful weekend. This weekend I have been catching up on a few projects, including my hand embroidered appliqués, that I mentioned several weeks ago. My plan is to make an apron; but as I mentioned before, I needed to do something to repair a hole in the fabric and I think that an appliqué was the perfect solution. Placing one flower seemed a bit skimpy, so I decide to add three flowers. My original plan was to do three different sizes, but I think in the end there is not a huge difference in the size.


I used a combination of chain stitch, running stitch and French knots. I really like the way it turned out and I think that the combination of stitches works really well for the pattern. I also changed the colours slightly, to give each flower a different look. I used two stands of embroidery floss, doubled the thread and knotted the ends together.


My appliqués have been sewn onto my fabric and I am excited to finish my apron. I will be sure to share with you the finished apron.

What do you think of the finished appliqués?


Saturday, September 14, 2013

Making a Hand Embroidery Appliqué


I love making aprons, and this week I decided that I would make an apron from a vintage pillowcase I recently purchased from a thrift store. It is a beautiful cotton print, but there is a hole in the middle of the fabric. I was thinking of ideas on how to cover the area and decided to add an appliqué.


Using a white vintage cotton fabric (from a twin sheet), I cut a piece of fabric large enough to cover one of the flowers on the pillowcase. I placed the white fabric over one of the flowers and secured with pins. I then traced the outline of the flower onto the white fabric using a pencil. There are several other transfer methods I could have used; however, I found this to be a quick and easy method.

I plan on doing a basic running stitch over the lines in alternating colours and will fill the centre of the flower with French knots. I will attach the appliqué with a running stitch on the last row to secure it to the printed fabric. The final phase will be to cut away the excess fabric around the edge of the flower. My plan is to make a total of three flowers of varying sizes.


Do you like appliqués? What do you think of the idea of using an appliqué to cover a damaged area?


Wednesday, July 10, 2013

Fabric Covered Bulletin Board

Our Crafty Home series has recently ended, however the crafty home decorating fun continues. There are several projects I will like to do for the summer and I am hoping that I can get them all done. Several of the rooms in my home are in need of some personality and there are a few items I will like to update. Among these items was a very standard 36" x 24" wooden framed bulletin board that hangs in the home office. I have had this bulletin board for a long time, and it needed a facelift. I find bulletin boards very helpful, but there is no reason they have to be boring.


I started my project by lightly sanding the wooden frame, then using a brush I stained the frame with the same MINIWAX Walnut colour stain I used in the stained wicker baskets project.


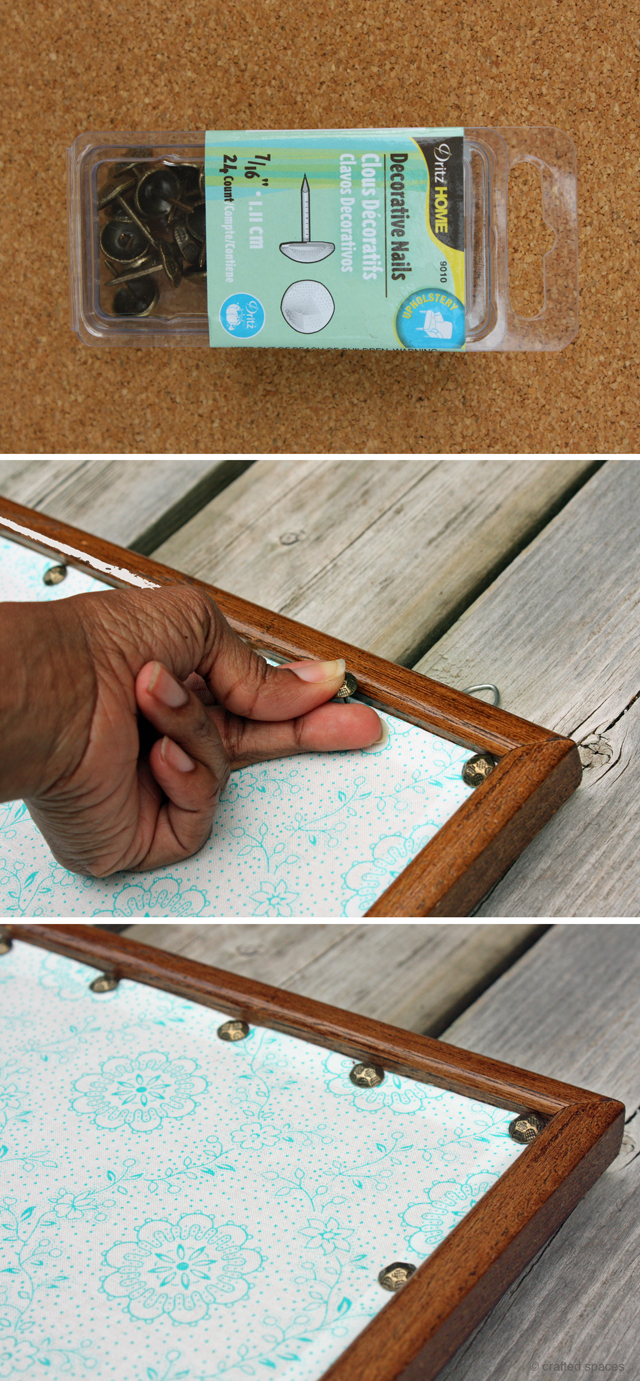
I followed by measuring the inside of the frame and cutting my 100% cotton fabric with an additional 1/2" on all sides. I then pressed under the 1/2" edge. I started tacking the fabric to the bulletin board starting from one corner and I found that it was easier to work on the short side of the board and work across from there. I used a total of 48 upholstery nails or "Decorative Nails." The nails went in by hand with a little effort; however, the use of a small hammer would probably save your fingers some discomfort later.


I debated over what type of print (or none print) to use and finally settled on a quilting cotton that I had in my studio. I think it will work well with my future plans for the room.


The longest part of this project was waiting for the stain to dry. I am happy with the results and I think that it makes an otherwise boring bulletin board look more interesting. What are your thoughts on this project? What do you think is the best way to give a bulletin board some personality?

Tips: Consider the depth of your bulletin board when you purchase your decorative nails. Remember to flatten your fabric as you work and evenly space your nails or tacks. Another thing to consider is the amount of stretch the fabric you have chosen may have.


Tuesday, January 22, 2013

Projects In The Works


This morning when I awoke, I just felt like going into hibernation when my husband announced that it was -27 degrees with the wind chill. I took the picture above yesterday afternoon, and as you can see we have had a lot of snowfall and this morning there was even more snow on the ground. With days like these I try to think of it as a rain day, like the ones I had as a child growing up in Trinidad and Tobago. I would use such a day to explore and create all the crafty things that came to mind, it was a perfect day to spend creating when going outside simply was not an option.

Today I decided to have my own snow day and I have been working on several projects. I wanted to share a few of my projects with you.


Chunky Crochet Cowl


This is a follow-up piece to the post Crochet In The Round. I lost the original cowl on a trip (I really loved it) and I did not make note of the pattern I created. I have been working at making another cowl and writing the pattern. I am working off of the pictures I originally took, and luckily for me I took tons of pictures and I have a complete file of the original project. I love the colour combination of the original, but I decided to try something new.


Pillow


I found the tutorial for this pillow some time ago, and I posted it on my Pinterest Sewing Board. However, when one of my young sewing students brought it to the studio and wanted to make it as one of her projects, I decided to try it as well. I started working on it over the holidays, but have been so busy that I have not finished. I am adding embroidery details and I am creating somewhat of an embroidery sampler. I really love the little French knots shown in the picture above, and I will be sure to post the details when I am finished.


Embroidery Patterns


I have a few new embroidery patterns that I am creating. I recently got some new embroidery hoops and I am awaiting an order of Sulky iron-on transfer pens for the studio. I am hoping to have my new embroidery patterns available on the online shop when they are ready. I am also introducing an Embroidery Workshop this spring, which I am very excited about. If you will like a fun embroidery project, check out the "Create" embroidery pattern.


First Sewing Project


Do you have your first sewing project? Well, I wanted to share one of my first machine sewing projects with you. I was about eleven years old when I made this pillowcase and I fell in-love with sewing and embroidery work. I also remember making a potholder that looked like a watermelon slice. I will be doing a new version of this project some time soon.

Thanks for joining me today!

Related Posts Plugin for WordPress, Blogger...