Wednesday, November 28, 2012

DIY Lampshade Makeover

This past weekend, I decided to give a makeover to the tired looking lampshade on my son's bedside lamp. The lamp is blue and the lampshade was blue and the room is blue (you get the picture).  I have been slowly making changes to his room and adding a few "big boy" touches since he turned ten years old this past summer. So needless to say, this is one of many things on a long list of things to do.


I decided to wrap the lampshade using a ball of jute twine that I had left over from a previous project. I have seen a lot of great lampshade makeovers, including the one featured here, which was done by Kim at Sand and Sisal. I also thought that the lampshade makeover at The Handmade Home, was super cute and so here I am.

BEFORE


I started off by carefully removing the piping from the top and bottom edge of the lampshade. I then placed a small bead of hot glue on the top edge of the lampshade (at the back seam). It was a bit tricky to get the right amount of hot glue initially, because I did not want large clumps of glue bleeding through the rows of twine. I found that it was helpful to run the tip of the glue gun over any hardened glue beads from the previous row. It was also helpful to hold my thumb on the end of each section as I made my way around the lampshade.


I wanted there to be tiny spaces, but was careful not to show too much of the blue fabric. In the end, I must say that I love the results. I especially love the texture, and the colour change was a welcomed addition. My son was not only happy to get his lamp back, but was also quite happy with his "new" lamp.

I did find the process a bit tiring, and it took a lot longer than I had anticipated finishing the project. I cannot say that I am going to be doing more of these any time soon, but I think it is a great way to breathe new life into an outdated lampshade.

I am debating if I should also do a lamp base makeover. What do you think?


Monday, November 26, 2012

Monogram Letters for Embroidery

I have been doing more hand embroidery work lately and I have been designing new pieces. I hope to share more of my creations with you; however, let me know what you think if you have a chance to check out my FREE embroidery pattern.

To add to my renewed exploration into hand embroidery designs I have been doing a lot of research. I am particularly interested in older patterns and combining unique stitches. I came across this blog post on Enbrouderie, that had such a wonderful link that I just had to share. I posted it on my embroidery pinterest board, but felt that it deserved its' own post.

What do your think of this stunning lettering? I really will like to add this to a linen pillowcase or something equally as exquisite. The beautiful illustration can even be used as art on its' own.


Image Source: Antique Pattern Library


If you will like to get the full collection along with other wonderful designs visit the Antique Pattern Library. You can download this collection of stunning lettering here.

Happy stitching!


Friday, November 23, 2012

Crafted Spaces Gift Certificate

We are so happy to present to you our new Gift Certificate. We have had request for these and up until now we did not have any printed gift certificates to provide to clients. They are 8.25" x 3.75" and printed on quality heavy weight paper. They include a white envelope along with regular mailing, to the address of your choice.

The gift certificate can be used towards any of our classes, workshops, products and other services. It can be redeemed in-studio, by mail or towards an online purchase from our Etsy shop.

To purchase a gift certificate, visit our Shop here or contact our studio for an in-person visit. You can also contact us by email or telephone for more information.

Contact:
craftedspaces@gmail.com
705-722-8132


Wednesday, November 21, 2012

DIY Coasters


Creating coasters from the metal lids that are on your frozen juice container is super easy and fun to make. It is a great way to repurpose this item that would otherwise be put in your recycling bin. It is also a great way to use scrap fabric, gift-wrapping paper or ends of your scrapbook paper. It can also be a great project for you to do with your kids.


With the help of some ModPodge and Dimensional Magic, this circular piece of metal is transformed into cute coasters. The coasters I made are from a combination of scrap fabric, gift-wrapping paper that my son Matthew received and scrapbook paper.


What you will need:

Metal lid(s)
Paper or fabric
ModPodge
Dimensional Magic
Scissors
Pencil
Small Paint Brush
Pin or Needle


Instructions:

1.  Clean the lid(s) and dry. You can also use rubbing alcohol to remove any residue or ink printed on the lid(s).

2.  Place a lid over the paper or fabric you will like to use and using your pencil, trace around the edge of the lid outlining the image(s) you will like.

3.  Cut out the circle from the fabric or paper and place inside the recessed side of the lid (you may have to cut the edges slightly for it to fit)

4.  Apply ModPodge to the recessed side of the lid and place your image on top, pressing from the inside and moving outwards with your finger, remove any pockets of air.

5.  Apply a coat of the ModPodge to the surface of your fabric or paper and let dry. When dry apply a second coat of ModPodge if you like.


6.  Once your project is dry, apply the Dimensional Magic working from the centre and towards the edges of the lid, covering the surface of the fabric or paper.

7.  Using a pin or needle, remove any bubbles that may have formed and check periodically while it is drying; removing any bubbles as needed.

8.  Let your piece dry overnight on a flat surface. I recommended covering your piece to prevent any dust or other elements from settling on the surface. I used a large glass to cover my pieces.


I think that these coasters are a great way to repurpose the lids. I had lots of fun making them and I hope that you will too. Let me know what you think of the project.

Enjoy!


Monday, November 19, 2012

Thank You For 20,000 Page Views!


Thank you for 20,000 page views!

We are so pleased that we have crossed the 20,000 page views mark, with much of this activity in the past year. This is not a large number in the grand scheme of things, but wonderful to see that so many people are enjoying our blog. Over the past year we have been working on developing quality content and connecting with our readers. We have also been working at making Crafted Spaces a creative resource.

We hope that we can make things even more interesting and we will continue to provide fun projects and creative inspiration.

Here are our top ten posts from the past month:


We want to hear from you, so please comment on our post and email us with your blog topic suggestions at craftedspaces@gmail.com. You can also join Crafted Spaces on Pinterest, FacebookTwitter and YouTube!

THANK YOU!


Saturday, November 10, 2012

Embroidery Hoop Art

Over the years I have enjoyed hand embroidering and have added embroidered details to many of my sewing projects. However, I must admit that it has been some time since I have done any embroidery work. However, due to several request, I have been thinking of adding an embroidery workshop to the Crafted Spaces sewing program.

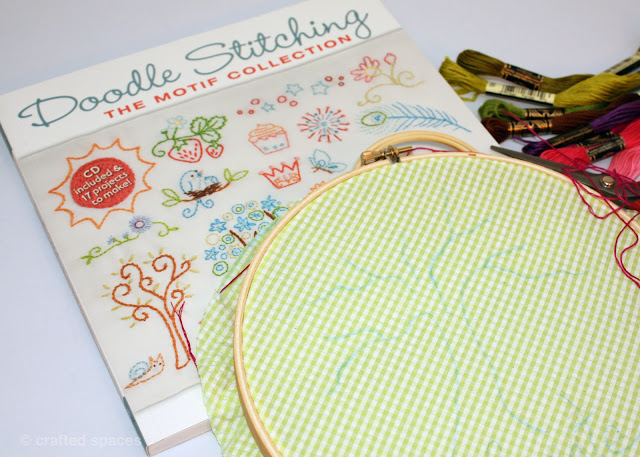
Earlier this week I did a book review on "Doodle Stitching: The Motif Collection" and as I mentioned in the review, I was inspired to start a new embroidery project. The book has tons of wonderful ideas, but I really wanted to create a design of my own. I also wanted to create something interesting for my studio and thought of making a hoop art piece.

I did not start off with a pattern or even a design in mind. I started by using some sewing chalk to outline the word "create." I then outlined the shape of a tree. The rest of the design just evolved as I was working on the piece. I have incorporated several embroidery stitches, but had the most fun with the "French Knot."

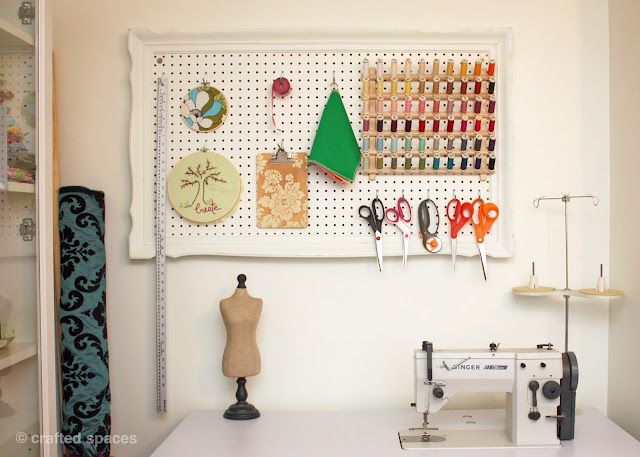
Once the piece was completed, I decided to display it on my new pegboard.


I used a piece of 100% cotton gingham fabric from my vintage fabric stash. I also used eleven different colours of 100% cotton embroidery DMC floss. Most of the stitches were done using three strands of floss; while for areas such as the tree outline I used the full six stands.


You can also make these super cute hoop art pieces with an interesting fabric print and forgo on the whole task of embroidering if you like. I have also seen some great hoop pieces using crochet doilies. I made this smaller piece using a piece of vintage 100% cotton fabric.


I think I will like to make more of these to decorate my studio wall. I definitely need a larger one and a couple in the 6" and 8" hoop size. I have already started a second piece, this time I'm using an oval shaped vintage hoop that I found at the thrift store.

What do you think about hoop art pieces?


UPDATE:
I have created a downloadable pdf of the embroidery design, which I will like to share with you. You can use any combination of stitches or colours you like. If you have any questions, just leave me a comment below.

I used three different shades of green for the leaves, which I did using a daisy stitch. For the flowers I did french knots using three different shades of pink. The bee was done using a combination of back stitch, french knots and the bullion embroidery stitch for the body of the bee. The outline of the tree was done using a stem stitch and the letters were done with a chain stitch.

Here is a FREE download of the pattern. Please let me know how your project turns out. I hope you enjoy!

Click Here for FREE Download!


Thursday, November 8, 2012

DIY Pegboard Wall Organizer


You can use a pegboard in any room in your home; however, I do not think that any craft or sewing space will be complete without one. A pegboard is a great way to organize tons of items and it can also add some interest to your wall.

In the process of giving my sewing and craft studios a makeover, I decided to make my own pegboard. I wanted something a little more ornate (yet functional) than many of the pegboards that I had come across. In other words, look pretty and do the job.


I decided to use one of the vintage frames from my stash and purchased a sheet of the pegboard at HomeDepot.


With the help of my husband Don, I cut the pegboard down to size. I was also lucky to get another piece just big enough to make a second (smaller) framed pegboard. The pegboard I purchased already had a white finish on one side, however I wanted to match the colour of the frame and pegboard. I painted over the pegboard using a small smooth roller. I could have used spray paint as an alternative.


The frame already had a gold metallic finish (from a previous project I had done with it) and I wanted to freshen things up a bit by adding a coat of soft cream paint. Plus, I did not want a gold coloured frame for my sewing studio. I painted the frame and lightly sanded between coats. I also lightly sanded some of the edges and upraised edges of the frame so you could see a little of the gold as highlights.


Don also helped me cut two pieces of 1" x 2" strappings, which was mounted to the wall at the wall studs.


Pegboard How-to:

  1. Cut the pegboard to the dimensions of the inside of your frame.
  2. Paint your frame and pegboard in your desired colour(s).
  3. Glue the pegboard into your frame using carpenters glue or an epoxy.
  4. Cut two strips of 1" x 2" wood to the same length of your frame's width or length. (This will become your strapping and it will also create some depth away from the wall for your pegboard to work properly.)
  5. Screw your strappings to the wall. (Consider using plastic anchors if mounting on drywall, otherwise find the wall stud and use a long screw.)
  6. Mount your pegboard onto the strapping using a screws and washers. (You are screwing into the pegboard, not the frame)
  7. You can paint the top of your screws and washers if desired.

If you will like to forgo on the frame, check out Martha Stewart for some tips on how to make and install a pegboard.

Here are some more great pegboard inspiration:

Wednesday, November 7, 2012

Making a Hand-Chain Scarf


I recently found this beautifully coloured yarn at Walmart. I love the colours and decided to purchase a ball to add to my ever-growing yarn collection.


The name of the yarn is "Swerve" and it is a product by Red Heart. The colour shown here is called "Barbados" ID#9936. You can visit here for more product information and other colour options.


This is what it looks like when you open out the ball.


You do not need a needle for this project. You are simply chaining the yarn with your hand to form a boa-style scarf. This is a project you can do in less than five minutes and would be a great gift. It is also something that kids can make as a fun project. Supper easy to make and looks pretty stylish too. There is lots of amazing colour combinations to choose from.


Red Heart also provides a printable instruction sheet, as well as this video tutorial on how to use the yarn:


Tuesday, November 6, 2012

Book Review: Doodle Stitching The Motif Collection


Doodle Stitching: The Motif Collection by Aimee Ray

Today I will like to share a new addition to Crafted Spaces library collection. The book contains "400+ easy embroidery designs" and includes a bonus CD. You can work along with the projects, or use the images to create your own unique combinations. The projects presented are simple and many of them will make great gift ideas.


The images and illustrations are playful, and the instructions are easy to follow. It is a great book for beginners; however, even an experienced stitcher can be inspired by the simplicity and whimsy of the designs. It is great inspiration if you are thinking about transforming your "doodles" into embroidery art, and has lots of ideas for you to play with as well. I also think that the CD is a wonderful treat and it adds additional value to the book.


After reading the book, I was inspired to create a new embroidery pattern. Even though I did not use the images from the book, I have to credit the author with conveying the idea of just having fun with images. I have started my new project and I hope to share it with you in a follow-up post.


To find out more about the author Aimee Ray, visit her blog or website. You can also receive a FREE download via the publisher Lark Crafts. ISBN 13: 978-1-60059-581-3

*As with all of our book reviews, this review was not solicited or endorsed in any way. The opinions expressed are my own and is presented in the spirit of sharing inspirational works and promoting creativity.

Related Posts Plugin for WordPress, Blogger...