Click for FREE download
You are probably thinking to yourself; what is the obsession with pincushions? Well admittedly I love them and we have featured a couple different ones; however, I have been asked to provide details on how you can make your own. I have created a FREE download with a template and instructions. This is a great project that will add a pretty touch to any sewing or craft space. It will also make a great gift for someone special.
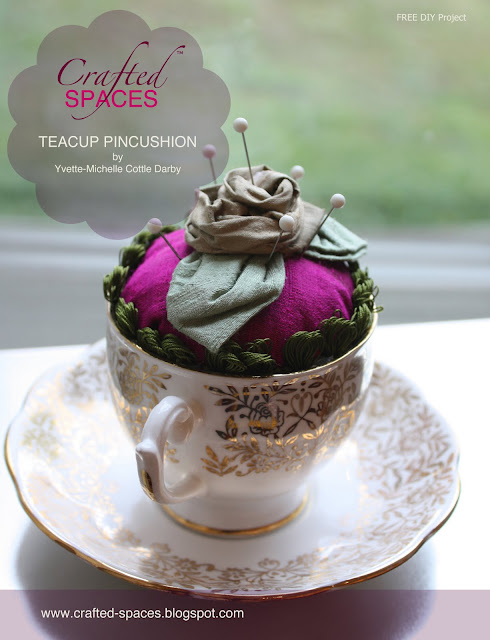
Instructions
![](https://blogger.googleusercontent.com/img/b/R29vZ2xl/AVvXsEjwaVoxMYb439UPBjLKBcc8rMAEwBuGG-WBa69FmjP7FqsohhhLD4N7GQyncAy9_OibjQVn16Pz9ligXbShyphenhyphenRH38gLdXrYUd25yXjiIwfMZiWF8LVfeevO23ZzA39fWM8PEjz8LNjMv6l4D/s640/teacup-pincushion1.jpg)
Collect materials and cut fabric into a circle using the template provided
![](https://blogger.googleusercontent.com/img/b/R29vZ2xl/AVvXsEjLMBU1EC7yBfBfODDcucsrlfkvh_nB-5htU_OnfGmctD_iPTbDNN_DKrx9STFLjuCBOhEurG9zA206MQQnUWc5zzQVnJY4G2b6vnvbLYVymZtF-GbuuoCTKbLHlY2QmyhFeVQbP9Q5O0nz/s640/teacup-pincushion2.jpg)
Pin pieces together as needed
![](https://blogger.googleusercontent.com/img/b/R29vZ2xl/AVvXsEhRASlwO-kfR8TU5bg59BMbXMI5hOK1-PHidVs-RqPsLq7HY6w0mX2A2i7-MqOQ_3y81B6agLyBl46bhnPnfb65UgRE9o9oCiMu33A016etvlfUGlnJH8Z9jo_8OyRBFC9PN1_m73GZL9GO/s640/teacup-pincushion3.jpg)
Pass running stitch approx. 1/2" from the edge
![](https://blogger.googleusercontent.com/img/b/R29vZ2xl/AVvXsEjEwgTn_m6CiHNGBMDTgC8TUQQHgZICyY4r3F38j4lQnMv8QIzOUThR32WpVCYJ5FiWENYnk5TloR3OBlDjVY2GSyW09HMA3MoOqrEgEd0UDA_rfLhJ9WmqXysREBAfEEGE7j1QYhWCmCXY/s640/teacup-pincushion4.jpg)
Pulling thread bring edge into the centre
![](https://blogger.googleusercontent.com/img/b/R29vZ2xl/AVvXsEg100Dq4_-BZbhV-n5YG6NcH2oxyDGgJBazDHKiWz1Ybzs54o9FVQzB2SUbPpv90WFRF7ZBywADDe1GiO5CkQSXiSgHQw7UnfZa0DXueTRgRkvwBwUhNEcyQgmJosy4ZnGNHyUPNBAMj5CL/s640/teacup-pincushion5.jpg)
Form a bowl shape and stuff centre with stuffing,
then pull thread tightly and stitch in place
![](https://blogger.googleusercontent.com/img/b/R29vZ2xl/AVvXsEgAjBstjrQPdIg-egLeoTFmkZuyd1VyfVfxbuDFOa2iDVt2HSjENZGe2L2NYasMKZjMy6hQH77bflDrZ4Wd-g8_gji9hPgLNNF4i0kqUdk3ZYq873jR1jBD9fI3Glbm1Ps2Lj9r0ZTPOiE8/s640/teacup-pincushion6.jpg)
Place additional stuffing to the inside of your teacup (container)
to the desired height
![](https://blogger.googleusercontent.com/img/b/R29vZ2xl/AVvXsEhegTj7j9id1RyP6VRD0lULHR4xp4cOURgF5jR1iZwWsSIeYi7M8iTD0nwkW2uN7w-zHJpBqzB6liopCaob3CgwKPb2rYw__JgVtNV6RXEMLc3R8JtZfUl1jULXGv8IMmvCm_gkOlk4jPon/s640/teacup-pincushion7.jpg)
Stitch or clue desired ribbon or trim (optional) to edge of stuffed fabric
![](https://blogger.googleusercontent.com/img/b/R29vZ2xl/AVvXsEiGPh5hAk9X223UlKBwT5AAeLGyvkryUakp_gc1U7nYXqeHP461nVodpkI9Km0DFERs7Ql3r20dx5I9wEvkyHnE5n1FBxtw2YWmUzTh2WL365HtYIbWOiFkGbQQPvEh-te6f_Za8L3Dsxox/s640/teacup-pincushion8.jpg)
Place glue along outer edge and at the base of the stuffed fabric
Set in teacup and press down in place
![](https://blogger.googleusercontent.com/img/b/R29vZ2xl/AVvXsEiNGzCJTW68zL-7fbgRQiLa4iTonBEDk99VrAQjidJL_WbEmHNqa6JKlhtzfe2QbLYUQhxdfQEX9W135WtfUyF_dLSRJbwtjBAt4nWUWQwhHTlGjsmCXLcrLXewKvtnngksa84Hp5KDHolx/s640/teacup-pincushion9.jpg)
Embellish as desired using flowers or other details
![](https://blogger.googleusercontent.com/img/b/R29vZ2xl/AVvXsEgE1KElvlTSTcy09Y3WJnenx_OsVFwXvBbfw6RbIAMAt4FBbC3zpopQ2qfT7q21K-pgEF8FTW-6UbRDg4msJRS6AEG78I9Zmk7b5Gfl3u3XbSTlZxpz2sZHkFyZBQ99-r90vGxGK8DjZEM5/s640/teacup.jpg)
Enjoy!
This comment has been removed by a blog administrator.
ReplyDelete