Thursday, January 27, 2011

Selecting Craft and Trade Shows


by Yvette-Michelle Cottle Darby

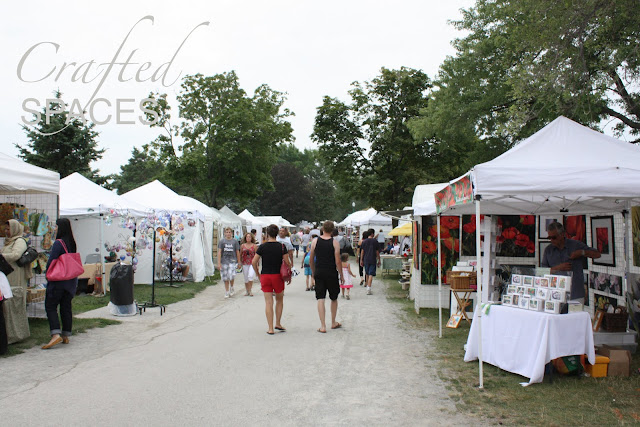
It is that time of year when many of us are getting organized in our studio and getting ready for another year of craft and trade shows. Perhaps you already have your list of events all lined up or are considering adding some new events to your schedule. Most of the show organizers are currently posting their new application packages and before long the application deadlines will be upon us.

Through my business Verona Collections I have been attending craft and trade shows for over fifteen years. Over the years I have done community based events, retail craft shows and wholesale trade shows. Most of the events I have attended have been juried. There are a number of shows that have built great reputations for themselves and they can be difficult to get into. However, don't despair, there are lots of shows to choose from and each have their benefits.

With so many shows to select from, finding the one that is right for you and your product can be overwhelming. To help you avoid the costly trial and error process, I wanted to share with you a few tips that have worked for me over the years.

Tips for selecting the right shows:
  1. Start early in your search
  2. If possible attend a prior show to evaluate if it will meet your needs
  3. Request information from show management that will help in your decision making i.e. target audience, attendance, and other stats
  4. Evaluate the full cost of attending the show; including, exhibit space, service fees, transportation, accommodations, etc.
  5. If possible chat with someone who attended the show to get feedback on their experience
  6. Enquire about what services and other resources are being offered by show management
  7. What percent of your target audience attend this show
  8. What price point are other vendors selling at
Join us at our NEW Crafted Spaces online community for a list of shows that might be of interest to you and your creative business venture. We also have available a "Show Evaluation" sheet that will help you with your selection process. Your comments and show suggestions are also welcomed and can be shared in the comment section of this post.

Wednesday, January 26, 2011

Ring Pillow


Our project today is for those of you who are preparing for a wedding and will like to make a ring pillow. The design featured was made from silk and was custom made for a friend, who had both her little boys serve as her ring bearers. I hope that you will enjoy making this project. You can adjust the length and width of the ribbons as you desire. You can also add other embellishments to your pillow.


Materials needed for this project:
  1. Small pillow measuring 9"x 9"
  2. 1.5 meters of 6" tule
  3. Fabric measuring 9.5" x 9.5" sq.
  4. Flower
  5. Satin Ribbon (desired width)
  6. Organza Ribbon (desired width)

Instructions

Stitch fabric along upper edge using 1/2" seam allowance
Fold tule ribbon in half and pin tule ribbon in place along side edges

Stitch along remaining sides of fabric using 1/2" seam allowance
and remembering to leave an opening at the bottom centre
Snip corners of the pillow with a scissors at an angle

Turn inside out and insert pre-made pillow into casing

Close opening with a needle and thread using a slip stitch


Attach flower to the centre of the pillow
and pull tightly through to the opposite side, creating a tufted effect


Add ribbon to the other side of the pillow in the centre
Pull thread through the centre onto opposite side and back through again to complete the tufted effect


Bring tule into the centre of the pillow
Cut upper piece of tule at centre point
Form a bow with the remaining uncut tule
Use the cut tule and organza ribbon to tie the bow against the pillow


Continue to add the remaining ribbon and any other embellishments you desire

Best wishes for your special occasion!

Saturday, January 22, 2011

Folder Makeover

I really love using view binders to stay organized. A range of things is stored in our studio binders including a catalogue of our crafts and designs. The binders are generally white and a white label has been printed and inserted into the spine of the binders, making it easy to organize and find information. However, I wanted to add a splash of colour to the binders and add some design elements to the studio. After considering a few options, I opted for using some scrapbook paper in a "Hot Pink and Purple Damask" pattern.

{Before}
The binders are well organized, but look bland and just pain boring.

{After}
This little makeover adds a bit of colour and makes them a lot more interesting.
What do you think?

Friday, January 21, 2011

Business Tips: Developing a Business Plan

by Dr. Cheryl Cottle

Many small business owners take their business idea from a concept to implementation without writing a business plan. Common reasons why some business owners don't have a business plan is because it can be a time consuming task, which also requires some research and know how. Others identify the cost of outsourcing someone to write a plan as yet another reason for not having one. There are also those who see a business plan as something that only larger businesses do or only required when seeking financing.


A business plan can be perceived as a daunting, formal approach to business that takes too much time to conceptualize, thus it is often neglected as a valuable guide to entrepreneurial ventures. Thus, rather than devoting the time to getting an overview of their business, many choose to learn as they go; responding to events as they occur or on a need-to-basis. This reactive approach to business development means that you are jumping head first into business; however, you can face many pitfalls that can ultimately require a great deal of time and resources to change.

While an entrepreneur has been defined as "one who takes risk," and rightfully so risk taking is indeed a great entrepreneurial quality; it is also prudent to reduce risk since it can negatively impact the cost of operating and managing your business. A proactive approach to business development will help you to define a business path and serves as an invaluable tool for achieving your goals.
Here are some helpful ways that a business plan can help your business.
  1. Define your business goals and objectives
  2. Will help you to identify your target audience
  3. Enable you to identify the best business model for your business
  4. Assist with cash flow forecasting
  5. Enables you to better understand the business sector of your business
  6. Identify the skills needed to manage and operate your business
  7. Identify the technology needed to manage and grow your business
  8. Gain valuable information about your competitors
  9. Develop your marketing plan
  10. Identify and develop your branding strategy
There are many resources available for small business owners that will guide you on how to develop a business plan. While a business plan can be a very large document that requires a great deal of details, you can also develop one that will simply serve as a road map to where you will like to take your entrepreneurial vision.

Link


About the Author
Dr. Cheryl Cottle is the founder and chief consultant of Cottle's Professional Consulting. Dr. Cottle is an education and business development consultant, and has written several post for Crafted Spaces. She holds a Masters degree in Instructional Technology and a Doctorate degree in Education and Computer Applications. She has worked as a consultant for over ten years and is also a social media expert, who works with individuals and organizations to achieve their professional and business goals. Dr. Cottle also provides women entrepreneurs with valuable business development resources through her CPC Women in Business group and other initiatives.

Website | Facebook


Thursday, January 20, 2011

Organizing Your Supplies

If you are anything like me, then keeping your countless amount of supplies in order is always a task. At the start of the year getting things organized for the year ahead might be on your list of priorities as it is on mine. I have two young children and running two creative ventures from the same home-based studio means organizing things down to every detail, if I hope to stay on top of things. Now no one is perfect nor why will you want to be, although in my mind there can also be some perfection in what might seem like chaos, but I'll leave that for another blog.

In speaking with other creative businesswomen, the topic of "How do I organize all the bits and pieces of things?" seems to be an ongoing challenge. We all find ourselves collecting items that we "might use" in a project. In my case, I often come across a piece of fabric that I fall-in-love with and just MUST have.

Here are a few suggestions for getting started:

Labels
Invest in a labeler or label maker or print tags or other labels. I have a very simple to use and fairly inexpensive DYMO LetraTag. It is very handy and uses a variety of labels. It sticks to a range of surfaces and are also easy to remove if needed. I have been using it on my plastic bins to label its contents.

Storage Containers
I have collected a range of storage containers including plastic shoe style boxes, baskets and stackable containers. I especially love using baskets. A collection of different size baskets are a great way to store supplies and adds a decorative element to your workspace.


The plastic and metal containers shown above are from Ikea, while the basket was a great find at WalMart. The studio also has a selection of baskets from HomeSense, which works well with the one featured.

Shelving
I use a variety of shelving units and store my fabric and other textiles on a shelving unit with glass doors. This allows for safe storage, but also allows me to see my supplies. It also forces you to keep things neat and tidy.

Over the next few weeks I'll be sharing more details about how Verona Collections - Crafted Spaces studio shapes up for the year ahead, and what we are doing to stay organized.

Wednesday, January 19, 2011

Learning to Knit

Knitting is among the list of things I will like to learn this year. When my eight-year-old son Matthew was born I started knitting a baby blue sweater for him, but I never completed the sweater. I learnt to crochet when I was little, and was always fascinated with knitting. Since picking up my crochet needle over the holidays, I have therefore decided to teach myself how to knit.

Armed with my knitting needles in hand and a vague recollection of what I had to do, I was determined to start and finish a project. I decided to use this wonderful Lion Brand yarn that I had left over from making my mom a crochet hat. With the almost overwhelming amount of information available at the library and online, I was able to figure things out. I now have my first knitted project.

{ lots of ways it can be worn }

When I was finished with the flat knitted piece, I felt like it needed something more, so I added a scalloped crochet edge and further embellished with crochet flowers and leaves. The flowers and leaves double as my closure. I cannot, by any stretch of the imagination call myself a knitter now; however, I did enjoy creating this project and will love to work on some more projects. I did not use a pattern, but instead created as I went along. Perhaps my next step should be to learn a pattern or two. A cheer to those who create wonderful knitwear designs!

Thursday, January 13, 2011

Planning Your Studio Space

Designing the look and flow of your studio can be a frustrating process. However, with a bit of knowledge and a dash of creativity, any space can be transformed into a functional and beautiful creative workspace. There are so many things on the list to consider including; laying out the room, selecting your furniture, organizing all those little bitty supplies that you just might need, and most importantly creating a space that inspires you to create.

You may have the challenge of working with little to no space or perhaps you are fortunate to have an entire room dedicated to sewing or craft; however, many of the same suggestions and rules will apply in both cases. Regardless of your available spaces, developing a basic floor plan can be invaluable. It will allow you to outline the dimensions of your room and identify the best possible layout to meet the needs of your workflow. At Crafted Spaces, we found it helpful to separate the room into sections based on specific task or functions.

When it came time to select our main worktable, the final choice resulted in an Ikea piece, which we felt met most of our needs.


The Ikea STENSTORP kitchen island has a great work surface, built-in storage space, and a sturdy construction. The height, at just less than 36" is also great for cutting and preparing projects. We also needed something that was not going to consume the small space we have to work with.

Tips for getting started with your studio space:
  1. Develop a floor plan
  2. Collect design and/or decorating ideas from magazines, online and via other sources
  3. Carefully select the colour(s) you are going to use, focusing on colour(s) that energize you and stimulates your creativity
  4. Select proper lighting for the task at hand
  5. Identify what type of storage and furnishings will work best for your type of craft
  6. Select a main workstation or table with a surface area that will best accommodate your projects and at a height that will not negatively impact your body
  7. Where possible select furnishings that have a solid construction and some available storage
  8. Be aware of the effects of direct sunlight on the materials you are working with
  9. Close your eyes and envision the type of space you need to enhance your creativity and productivity
  10. Have fun with the process

Suggested Reading:

Organizing Your Craft Space by Jo Packham

Wednesday, January 12, 2011

The Love of Crochet

Over the years I have enjoyed the art of crocheting. I remember all the great little baby items that my grandmother had made for me, and I think I still have a piece or two stored away. With the birth of each of her new grand child my grandmother has patiently and lovingly created a new baby blanket along with other great goodies.

Even now my children, the first of the great grand children have received their special blankets, booties and coats. Today I spent some time just sitting with my grandmother, each of us holding our crochet needle and working on our respective projects. I felt a true connection with her and the memory of her showing me my first crochet stitches as a child came to mind. I was truly happy to have the time to spend with her.

I had not crochet in several years, but decided that I wanted to make my baby something special. It is amazing how once you learn something you love doing; it can all come back to you no matter how long you stepped away from it. I even ventured to make a hat for my mom and husband.

Crochet: The Complete Guide by Jane Davis is a gift from my husband and a new addition to my resource library. It is a great book for beginner to advance alike, and both my grandmother and me are having fun learning and refreshing our skills.


Wednesday, January 5, 2011

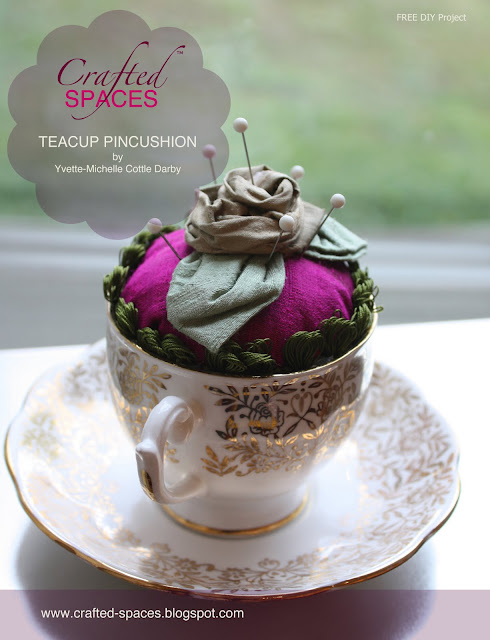
Teacup Pincushion

Click for FREE download

You are probably thinking to yourself; what is the obsession with pincushions? Well admittedly I love them and we have featured a couple different ones; however, I have been asked to provide details on how you can make your own. I have created a FREE download with a template and instructions. This is a great project that will add a pretty touch to any sewing or craft space. It will also make a great gift for someone special.

Instructions


Collect materials and cut fabric into a circle using the template provided

Pin pieces together as needed

Pass running stitch approx. 1/2" from the edge

Pulling thread bring edge into the centre

Form a bowl shape and stuff centre with stuffing,
then pull thread tightly and stitch in place

Place additional stuffing to the inside of your teacup (container)
to the desired height

Stitch or clue desired ribbon or trim (optional) to edge of stuffed fabric

Place glue along outer edge and at the base of the stuffed fabric
Set in teacup and press down in place

Embellish as desired using flowers or other details

Enjoy!
Related Posts Plugin for WordPress, Blogger...