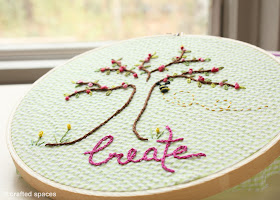
Earlier this week I did a book review on "Doodle Stitching: The Motif Collection" and as I mentioned in the review, I was inspired to start a new embroidery project. The book has tons of wonderful ideas, but I really wanted to create a design of my own. I also wanted to create something interesting for my studio and thought of making a hoop art piece.
I did not start off with a pattern or even a design in mind. I started by using some sewing chalk to outline the word "create." I then outlined the shape of a tree. The rest of the design just evolved as I was working on the piece. I have incorporated several embroidery stitches, but had the most fun with the "French Knot."
Once the piece was completed, I decided to display it on my new pegboard.
I used a piece of 100% cotton gingham fabric from my vintage fabric stash. I also used eleven different colours of 100% cotton embroidery DMC floss. Most of the stitches were done using three strands of floss; while for areas such as the tree outline I used the full six stands.
You can also make these super cute hoop art pieces with an interesting fabric print and forgo on the whole task of embroidering if you like. I have also seen some great hoop pieces using crochet doilies. I made this smaller piece using a piece of vintage 100% cotton fabric.
I think I will like to make more of these to decorate my studio wall. I definitely need a larger one and a couple in the 6" and 8" hoop size. I have already started a second piece, this time I'm using an oval shaped vintage hoop that I found at the thrift store.
What do you think about hoop art pieces?
UPDATE:
I have created a downloadable pdf of the embroidery design, which I will like to share with you. You can use any combination of stitches or colours you like. If you have any questions, just leave me a comment below.
I used three different shades of green for the leaves, which I did using a daisy stitch. For the flowers I did french knots using three different shades of pink. The bee was done using a combination of back stitch, french knots and the bullion embroidery stitch for the body of the bee. The outline of the tree was done using a stem stitch and the letters were done with a chain stitch.
Here is a FREE download of the pattern. Please let me know how your project turns out. I hope you enjoy!
 |
| Click Here for FREE Download! |


I love the tree design. I may have to copy that.
ReplyDeleteThanks Cassi. It was lots of fun to make. Because the design evolved as I was stitching I don't have a pattern, but I am working on one and I hope to do a follow-up post. You are free to try your own version of it; I would love to see how it turns out.
ReplyDeleteHi! This is a beautiful piece & thanks so much for the free pattern! I am just learning hand embroidery, but this seems like a very doable project for me. Thanks again :) ~Ali
ReplyDeleteThanks Ali. I'm happy that you like the pattern. Let me know how it turns out for you.
ReplyDelete